Monday, July 9, 2012

Recycled Self Watering System

This is a great way to reuse your plastic bottles, put your green thumb to work & let your plants water themselves!

It can be tough to find the time to water your plants, so why not let them help you!

beautiful.
I Love Sage !


-- materials --


1 plastic bottle inculding cap

starter plant or seeds

scissors

1 nail or screw

a hammer

cotton or hemp twine about 1 foot long

organic soil or composted soil


-- cutting --


start your project by cutting your plastic bottle in half.

make sure not to loose your cap!

once in half,  cut around each piece getting rid of any pointed edges that may get in the way.


-- creating your wick --


get your hammer ready ! !

take your nail or screw & hammer it into the bottle cap.


this will create the hole in which you will pull your thread through.

like so :


be sure to knot your string with about a 2 inch loop at the end.

have the loop & knot end of your string be on the inside of your bottle cap.

what this will do is act as a wick which will draw the water from your created basin & into the plants soil. This way the plant will water & regulate itself keeping the soil moisture perfect for your plant!


-- creating your basin --


place your cap back onto your bottle

fill the bottom of your plastic bottle about 1/3 with water

now place your top part of your plastic bottle UPSIDE DOWN inside the bottom half


make sure the cap is completely submerged under water

as you can see, the string is already doing its job!


-- planting your seeds --


now you can either plant your seeds or starter plants directly into your bottle!

make sure you add enough soil & follow the seed packet instructions if using seeds

once planted, be sure to water the top part of your plant, filling the rest of the basin & making sure that the top & bottom soil are uniformly wet.


Before you know it your seeds will sprout and your soil will be regulated to perfection!

thank you for recycling!


keep getting crafty, sustainably of course.


namaste.

Sunday, July 8, 2012

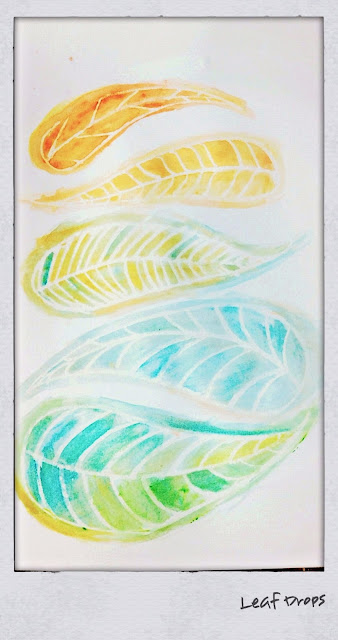
Watercolor resist

ever wonder what to do with that poor old white crayon? the one that never gets used! Here's an awesome craft that is simple, relaxing & creative.


your white crayon will thank you.


-- materials --


white crayon

paintbrush

watercolors

watercolor paper

glass of water


-- resist --

get your white crayon ready! 
in this project the crayon acts as a resisit, a coating that protects a surface during some sort of process, preventing the watercolor from touching it.


draw a design onto your paper using your crayon.
this may sound odd since you cant really see what you are drawing to well, but with the correct light angle, its easy!

here is mine up close


-- watercolor --

once you have completed your design its time for your watercolors.
have your glass of water handy!


i find it helpful to add water over the part of your design you are painting first before applying any watercolor.
this helps the color spread and gives it a more marbled look.

make sure to highly dilute your watercolors.


the wax from the crayon resists the diluted colors better

-- painting --

begin adding your paints to your diluted drawing.
here's where you can create marble affects by adding single drops of color at a time into the water droplets on your design


because we are diluting the colors, they may not be as bright as you would like.
let your watercolors dry a bit then go back and add more colors until desired hue.


if your water runs onto your wax at any point, take a corner of a napkin and let it soak up the access moisture. you can then go over your line again using your crayon.

create, create, create!


namaste.


Sunday, July 1, 2012

Organically Independent

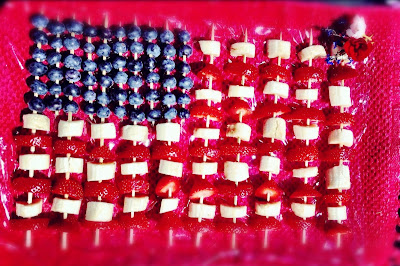
Why not celebrate the 4th organically & creatively!?

This quick & easy recipe is a healthy addition to any BBQ that friends & family will LOVE!

CAUTION: will be gone before ya know it ! ! !

-- ingredients --


1 pack of organic strawberries

1 pack of organic blueberries

4 organic bananas

15 kabob skewers

-- set up --


prepare your fruits by washing and cutting properly


I cut the strawberries horizontally, getting about 3 pieces each strawberry, then cutting each piece in half.
That way the kabob skewers will lay flat against your plate.

To cut the bananas, make a slice down the middle of the banana. Then holding both cut sides together, cut about 1/2 inch pieces all the way down. This will give the bananas the same semi-circle look as the strawberries.


 now its time to make our flag!

-- stars & stripes --


the amount of skewers depends on the size of your plate. 
I used a regular size cookie sheet that fit about 10 skewers across. 

lets start with the blueberries

YUM!!
The blueberries are the easy part!
I used 6 blueberries per kabob & spaced them out evenly.
I then went back & cut some of my skewers in half & added 5 more smaller blueberry skewers to make the presentation a bit stronger . . . . . & because I'm a huge blueberry lover :)


Now, add your bananas & strawberries ! These will represent your stripes so make sure you are spacing evenly & keeping count of how many you are using on each kabob!
 It should look something like this :

awesome!
 

 Now you are ready to make your stripes!

Continue with your strawberry, banana, strawberry, banana pattern & before you know it you will have a beautiful organic plate of delicious stars & stripes!


Now thats one good lookin flag.


Happy 4th Of July!


namaste.